Thanks for all the help so far. I`ve tried following every tutorial. Managed to create basic custom items by cloning existing assets and changing their colour. Not very inventive, but a start. Basically, what I want to do is take an existing model, alter it (ie draw a cross on it for example), then save it and create an icon for it (with the cross). I know how to create the icons using paint.net (I just load up the existing icons in the game, cut one out, edit it, then save it using the gfxatlas program. But its the textures thing that I cant get my head around. Can I save the icon as a textures file (ie _dif.dds) so that the model will use it (so the cross will show up on the model). Or how can I alter the existing textures file for the model to include a cross so that it shows up)? I`m struggling here, as you can probably tell. I have installed Grimrock Model Toolkit, GraphicsAltas Toolkit, Paint.net, GIMP2, and Blender. Any help greatly appreciated (an idiots guide on how to do it would be very welcome!)
Thanks
George
CUSTOM GRAPHICS HELP (AGAIN!)

Re: CUSTOM GRAPHICS HELP (AGAIN!)
Re-texturing a model is usually a very involved process. There are models like the tapestry/goblien, and some floor tiles that are not so involved ~they are flat squares, and a simple material swap often gives decent results in the game. But for something like a weapon, or an inventory item, you will have to have a working knowledge of UV editing, and a 3D modeling application to do any significant changes beyond recoloring. This is because the software bends and stretches the material texture around the 3D model. It's not impossible to draw on the texture and have it show up in the game, but the results are not easily controlled in a 2d paint program.WaspUK1966 wrote:Thanks for all the help so far. I`ve tried following every tutorial. Managed to create basic custom items by cloning existing assets and changing their colour. Not very inventive, but a start. Basically, what I want to do is take an existing model, alter it (ie draw a cross on it for example), then save it and create an icon for it (with the cross). I know how to create the icons using paint.net (I just load up the existing icons in the game, cut one out, edit it, then save it using the gfxatlas program. But its the textures thing that I cant get my head around. Can I save the icon as a textures file (ie _dif.dds) so that the model will use it (so the cross will show up on the model). Or how can I alter the existing textures file for the model to include a cross so that it shows up)? I`m struggling here, as you can probably tell. I have installed Grimrock Model Toolkit, GraphicsAltas Toolkit, Paint.net, GIMP2, and Blender. Any help greatly appreciated (an idiots guide on how to do it would be very welcome!)
Thanks
George
There are image editors that can load a 3D model and allow you to paint on it with a measure of control.
Materials are [can be] three image textures. One for color, one for reflectivity, one for faked surface angles (additional detail). This last one is called a 'normal map', and it's used to affect the shading of the object.
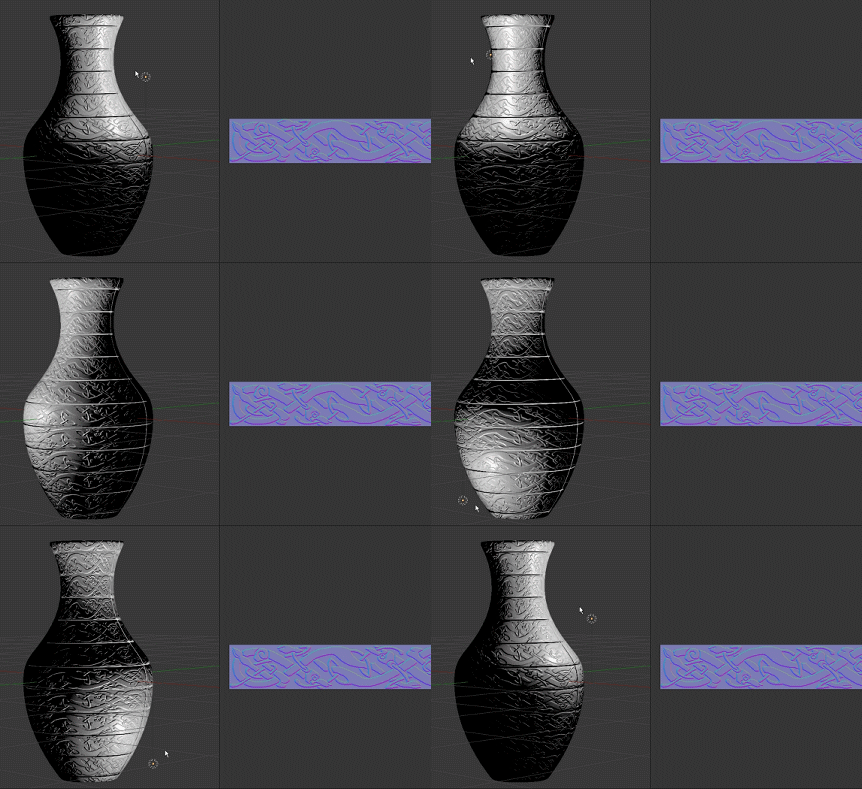
You usually need to change the normal map when you change details on the color map (diffuse) texture. That's not something that you normally do by hand; (although there are some applications now that do help with manually drawing details).
This decently explains normal maps.
http://www.bencloward.com/tutorials_normal_maps1.shtml
Here is a video tutorial that demonstrates creating an object, and its normal map, using Blender.
https://www.youtube.com/watch?v=OKXg5oHDz_4
**Bear in mind that these are not strictly tutorials for Grimrock itself; but they can give an understanding of what you are looking at in the asset pack.
To customize an item in Grimrock ~the easiest way, but not the best way~... You clone or define a new item. Import the .model object into Grimrock toolkit. Change the assigned material for the item to a new material definition (that you create in the materials.lua file, in the scripts folder). Save the new model [new name] in the models folder. Assign the new model to your object definition.
With the material images, alter the color map as suits you, then use the Nvidia Plugin for Gimp to make a normal map from the altered color map.
https://developer.valvesoftware.com/wik ... n_The_GIMP
What this does is create a 'best guess' faked normal map, that will likely have decent results; Use that normal map in your object's material.
Preview it in Grimrock toolkit, and if it looks good, preview it in the game.
If later you decide to create new objects, or more complicated changes to existing ones, you can use a modeler like Blender to design or alter the model, and generate the true normal map from it. You can also use Blender's material editing features and/or/with GIMP to create the color map and details.
It is possible to combine (in GIMP) a Blender generated normal map with a derived [faked using the Nvidia plugin] normal map like the one mentioned above, to get the best of both.
-
WaspUK1966

- Posts: 135
- Joined: Sat Aug 09, 2014 9:17 am
Re: CUSTOM GRAPHICS HELP (AGAIN!)
Thanks for such a detailed explanation. Clear as mud but will give it a try! Thanks once again for taking the trouble to answer my query. Still all a learning curve for me, but I`m getting there. Maybe I`ll be able to help someone else out one day. You never know!
George
George